Thank you for your purchase of our Model 2840 Radio Panel designed exclusively for X-Plane 11 Flight Simulators.
Using the Easy Programming Instructions seen below, you can have your 2840 Panel up and running in minutes.
Now Enjoy your Newly Found X-Plane Realism!
Using the Easy Programming Instructions seen below, you can have your 2840 Panel up and running in minutes.
Now Enjoy your Newly Found X-Plane Realism!

Links to aviation directory
resources & information websites


Desktop Aviator HOME Page
International Shipping Info
Setting Up your
2840 Radio Panel
2840 Radio Panel

The Model 2840 Radio Panel was designed to be flush mounted inside your homemade aircraft panel or the GoFlight or Cockpit PHD Panel Rack. The 2840 measures 7.25in inches by 2.0 inches.
Two mounting holes are provided to help in the fastening the Radio to your flightdeck or Rack.
Once mounted inside your flightdeck or GoFlight Rack, take the USB cable coming from the 2840 and insert it into an unused USB port on your computer. The computer will automatically sense and load the appropriate Arduino driver software. Once loaded, this software will remain on the computer even in the event of a power-down.
Installing the 2840 Radio Panel
With the 2840 Panel plugged into your computer's USB Port, the computer will search and load the appropriate Aduino driver software. This will take a minute or two. Now, with the driver loaded, it's time to download the 2840's Plug-in and configure the panel to output the desired Radio operation.
Now would be a good time to let you know that you MUST Keep the Panel connected to the SAME USB port as it is now. If removed and placed into another USB port, all your programming will be lost. So before starting the configuration, make sure you are comfortable with the 2840's USB port. If so, lets get Started.
Now would be a good time to let you know that you MUST Keep the Panel connected to the SAME USB port as it is now. If removed and placed into another USB port, all your programming will be lost. So before starting the configuration, make sure you are comfortable with the 2840's USB port. If so, lets get Started.
Programming the 2840 with X-Plane

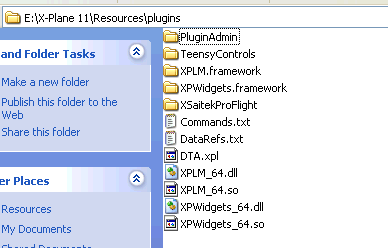
As mentioned previously, you need first to download and install the 2840's Plugin (DTA.xpl). You can click HERE to download the .zip file. When downloaded, you can un-zip the file into the X-Plane11's Resources/Plugin folder
C
V
Installation Instructions
Happy Flying!


X-Plane's File Folder

2840's Plugin (DTA.xpl )Must be installed HERE.
No Folder required
No Folder required

So you now have the Radio Panel plugged into the computer's USB Port and you have the Plugin in the Resources/Plugin Folder; now it's time to configure the panel.
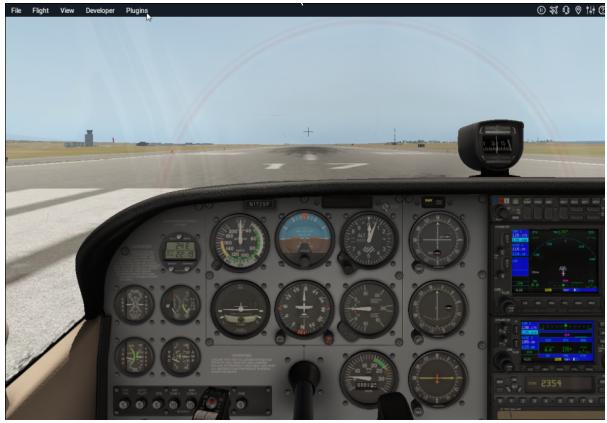
For this, lets use X-Plane 11's supplied Cessna 172 aircraft. Run X-Plane as you normally do. When loading, you will see the software read and load the DTA.xlp plugin. When all is running normally, you see the standard opening 172 graphic on the screen.
For this, lets use X-Plane 11's supplied Cessna 172 aircraft. Run X-Plane as you normally do. When loading, you will see the software read and load the DTA.xlp plugin. When all is running normally, you see the standard opening 172 graphic on the screen.
Drag Mouse Cursor HERE
and Left Click
That Click will
Brings up this window
and Left Click
That Click will
Brings up this window

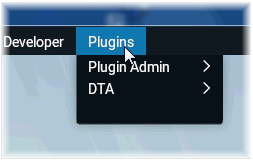
Drag the Mouse cursor to the upper left top of the screen and click on Plugins. When "clicked", you will see a small window appear.
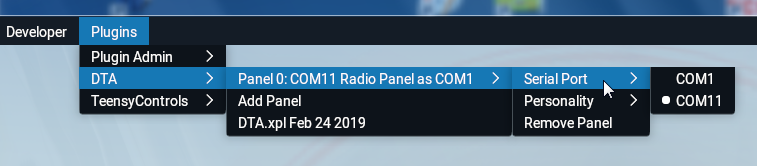
Drag the cursor to highlight DTA. Now drag cursor to the right. This will highlight the previous configuration of the panel. With only one panel connected to your computer, it will be called Panel 0: Now, lets set which USB Com Port we want X-Plane to talk to the Radio Panel. Continue draging the cursor to highlight Serial Port.
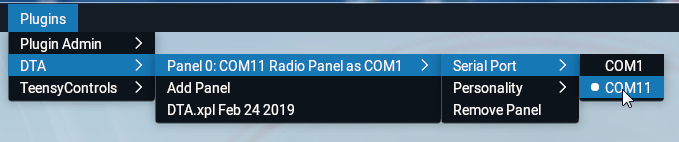
Continue draging the cursor to the right. Now the available ports are displayed.
NOTE: It is recommend NOT to set the Panel to COM1
In this example, we have only 1 available Serial Port and this is Com11. If you have a Powered USB Hub, you will see a listing of available ports at this location.
Again, for this example, lets click on COM11
NOTE: It is recommend NOT to set the Panel to COM1
In this example, we have only 1 available Serial Port and this is Com11. If you have a Powered USB Hub, you will see a listing of available ports at this location.
Again, for this example, lets click on COM11
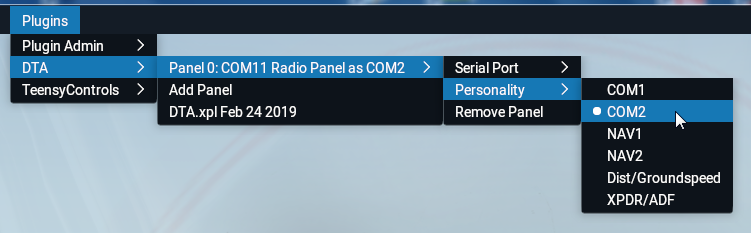
Now, lets set what is called the "Personality" of the Panel. Again, going to Plugins; then DTA; then Panel 0. This time lets goto Personality. Here a new window opens up showing the available options that the 2840 can be configured too; COM1, COM2, NAV1, NAV2, XPDR settings and a display of your Groundspeed.
For this example, lets click on COM2.
As soon as you click on COM2, the large window disappears and the X-Plane frequency setting for COM2 will now appear on the 2840 Panel.
Lets do a quick test; Turn the 2 knobs on the Dual Rotary Encoder Switch to the right of the LEDs and note how they change frequency in the STANDBY window. Also note the freq change on the computer's monitor. They will be the same.
To change the STANDBY freq to the ACTIVE window, just press the White push button switch located between the two LED windows. Now note that the frequency just set by you is now the Active frequency that is being used by X-Plane
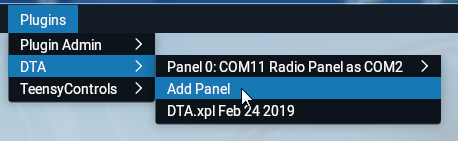
So you already have one panel installed and you purchased a second or a third or a fourth. Additional panels can be easily installed.
With the second panel already plugged into another USB Port, drag the mouse cursor to the top of the screen and left click on Plugins, just as before. This time, drag the cursor to DTA then highlight Add Panel.
Now we just repeat the Com Port, and Personality selection just as before.
If you have more then one panel to install, it's advisable to configure one panel at a time. When panel one is configured, then plug in panel two; when two is configured, then plug in panel three. NOTE: you might need to re-start X-Plane each time a new panel is connected so X-Plane can "see" the additional hardware.
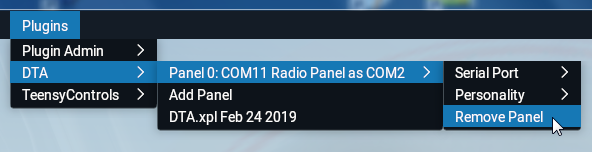
To remove a panel, it's just as easy. Again, going to he Plugins (top of screen); then DTA; then highlight the panel you wish to remove. When highlighted; just click on Remove Panel.
Well, that takes care of the installation and configuration of the 2840 Radio Panel. If you have any questions or see an errors, you can contact me at:
support@desktopaviator.com
support@desktopaviator.com