|
|
|
INSTALLATION
INSTRUCTIONS for
the CESSNA Avionics Panel MODEL 1015
|
| ||
|
|
|
|
| ||
|
|
|
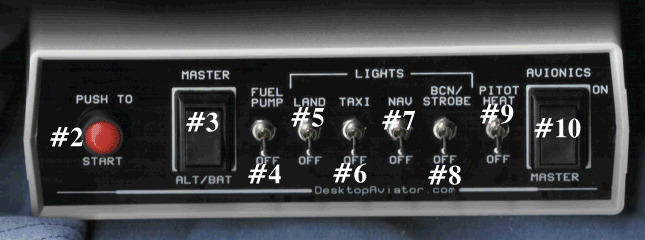
Installing the CESSNA Avionics Panel
Above
is a photo of the Avionics' Front Panel. Notice the Numbers assigned to
each Switch and Push-button. These switch numbers will be used when we
Program our Flight Simulator to recognize which button is pushed. The
IGNITION Push Button Switch is assigned #2 (Position #1 is not used
at this time). We'll get into programming the Flight Simulator in just a
moment.
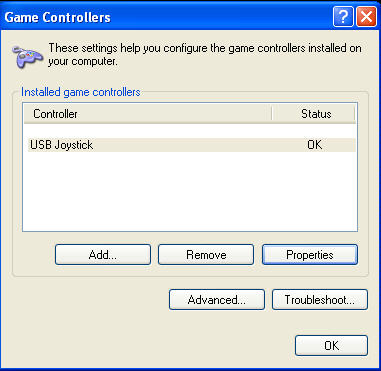
With
your computer running; Click on the 'START' Icon; then 'Control Panel',
then 'Game Controllers'. With your Avionics Panel connected to the USB
Port of the computer, you will see the window illustrated above. Click on
'Properties'.
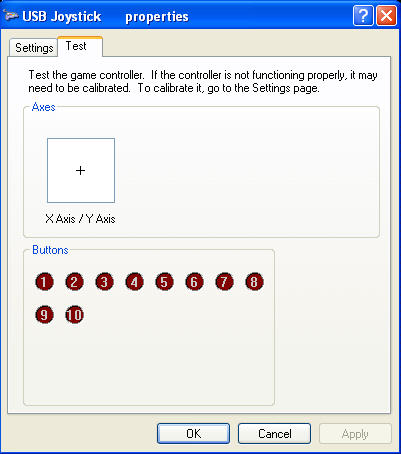
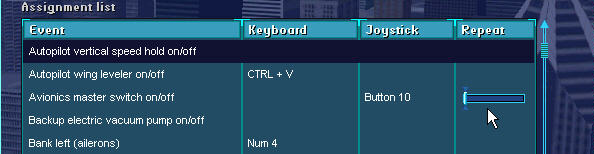
Press
the "Press to START" Button, note that the #2 RED Ball Lights. Now
Flip the MASTER ALT/BAT Rocker Switch to its On then OFF Position. Note
that the #3 RED Ball Flashes "ON' then goes 'OFF" in about 1/2 second.
This is normal. Flip the MASTER ALT/BAT Rocker again. The #3 Ball flashes
again. If you flip the AVIONICS MASTER, the #10 RED Ball will flash just
like the ALT/BAT Rocker did. Now
press Buttons #'s 4 to 9 (one at a time) and note the corresponding RED
Ball illuminates. This time the Ball lights for as long as you keep the
button pressed. The AXIS window (X Axis/Y Axis) & the #1 RED Button
will NOT Operate at this time. Programming
Your Flight Simulator With
the following instructions, it is assumed that you are already familiar
with programming the 'SETTINGS' / 'ASSIGNMENT' window in your version of MS
Flight Simulator. If this operation is unfamiliar to you, you can go HERE
(Installing
the Brake Pedals on Your Flight Simulator)
for
an in-depth explanation to this procedure. With
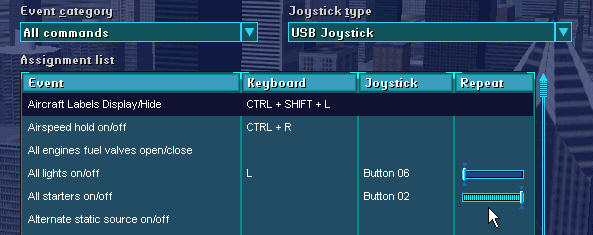
your Flight Simulator running, Click on the 'SETTINGS' link then 'ASSIGN'.
Highlight under 'Joystick Type' USB
Joystick
as seen below. We will now program the FS to acknowledge the switch
settings of the Avionics Panel. To make things a bit easier, I will be
going down the 'All
Commands'
(Event Category) in alphabetical order. When we reach the appropriate
EVENT, I'll tell you which of the 10 buttons on the Avionics Panel to
Press. OK? So lets Start.
Locate
'All
Lights on/off'
(see above) Assign Button
#6
of the Avionics Panel to this Event. The REPEAT
Bar
is to be all the way to the LEFT. Locate
'All
Starters on/off'
- Assign
Button #2
to this Event. Button #2 is located on the "Press to START" Button. Press
the Button then click OK. NOTE: The Repeat
Bar
is ALL
THE WAY TO THE RIGHT.
This IS IMPORTANT. Using your mouse, just drag the Repeat Bar to the
Right. Then Click OK.
Now,
Scroll down to 'Avionics
master switch on/off'
- Assign Button
#10
to this Event. For the programming of the remaining switched, the Repeat
Bar is to remain in its LEFT position.
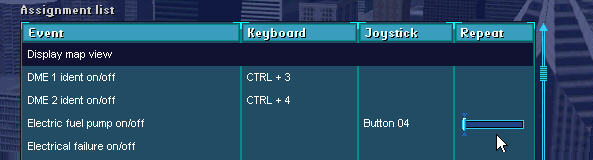
Scroll
down to
'Electric fuel pump on/off'
- Assign Button
#4
to this Event. 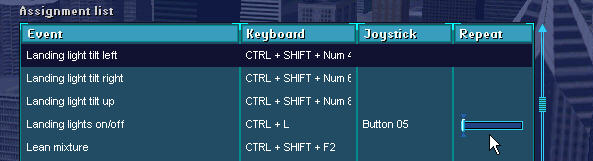 Scroll
down to
'Landing Lights'
- Assign this Event to Button
#5.
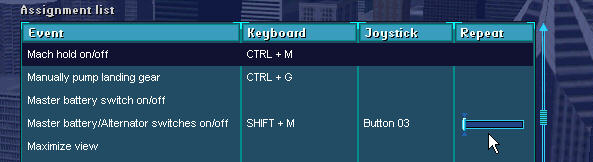
Scroll
Down to '
Master battery/Alternator switches on/off'
- Assign this Event to Button
#3.
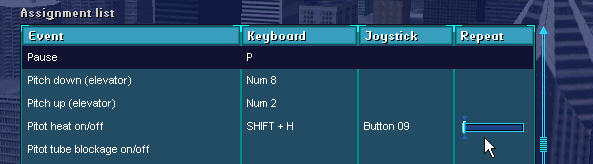
Scroll
Down to 'Pitot
heat on/off'
- Assign this Event to Button
#9.
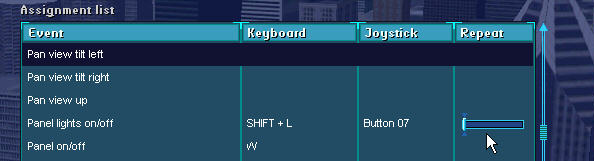
Scroll
down to 'Panel
lights on/off'
- Assign this Event to Button
#7.
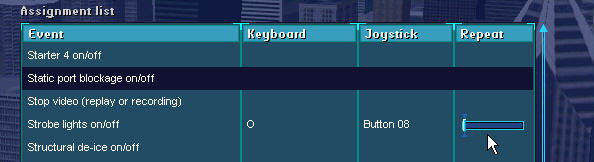
Finally,
Scroll Down to 'Strobe
lights on/off'
- Assign this Event to Button
#8. NOTE
that pressing the NAV and Strobe, you will not be able to see any
difference to the aircraft during daylight flights. Program FS Clock for a
time of day after sunset, then press the NAV Lights Button. The Instrument
Panel will light up. Strobe Lights can be seen if you switch to an outside
view of your aircraft. You will notice wing and tail lights
flashing. One
other thing to take notice of; Microsoft did not provide any means to
control the TAXI Lights in FS2002. In order to turn on the Taxi lights, I
programmed 'All lights on/off' using switch #6. This will turn on the Taxi
lights but it will also turn on the Landing, NAV and Strobe lights as
well. If this Assignment is not to your liking, it is an easy matter to
re-program the #6 Button to some other setting; like Carb
Heat. Out
of Sync Switches Every so often, you might find that a switch on the Avionics Panel is not set as per the Instrument Panel on your Monitor (AKA Out of Sync). If you fine that the MASTER ALT/BAT and/or MASTER - AVIONICS switch is not in Sync with the Instrument Panel, just take your mouse and LEFT-Button CLICK on the Master Alt/Bat (and/or Avionics) on your monitor until BOTH switches match the Settings found on the Avionics Panel. Using
Your Cessna Avionics Panel
Once
you have your Avionics Panel programmed via your Flight Simulator, it's
now time to take it for a spin. Load your version of Microsoft's Flight
Simulator. When Loaded and Running and Before you select the aircraft and
flight, make sure the Avionics Panel's MASTER
ALT/BAT
is ON
(#3
switch - See Above)
MASTER
AVIONICS
Switch is
ON (#
10 Switch).
These
are the Start-Up Settings of an un-modified Flight Simulator
Program. With
your Cessna's Engine running (Check Tachometer - should be reading about
1200 RPM). Using your Mouse, click on and pull the FUEL Mix (Red Knob) All
the way out. Within a second or two, the
Engine Cuts-off. Now, with the Engine OFF turn the MASTER
ALT/BAT
to its OFF
Position notice that ALL
Electrical equipment turns off. Now, turn the AVIONICS
MASTER
Switch to OFF
To
Restart the Engine, Flip the MASTER
ALT/BAT
to its ON
Position. Your Panel's electrical systems comes to life; LED readouts
light up, Meter Pointers move to their NORMAL Take-off Positions. To
assist the Fuel in getting to the Engine, the FUEL Pump should be turned
on at this time( #4 Switch). Press the FUEL
PUMP
Switch and notice that the Toggle switch displayed on your computer screen
also flips UP at the same time. To turn OFF
the FUEL
PUMP,
just press the #4 button again. Again, note that the Monitor's toggle
switch also flips DOWN as the same time. Using
your CH Flight Yoke or Keyboard Mouse, set the Fuel Mixture to its FULL
RICH setting (all the way in). Press the "Press to START"
Button
(#2 switch) and keep it pressed until the Engine is Running on its own.
When running, remove your finger from the Button.
If you wish, you can now flip the AVIONICS
MASTER
Switch to ON.
|
| ||
|
|
|
|
| ||