

Thank you for your purchase of our Cessna Combo Panel.
The Models 2625, and the 1019 are compitible with FSX/FSUIPC, Prepar3d and
X-Plane (v10 and 11).
Below are the Tables that contain the Switch settings that need to be configured using your Flight Simulator software. It is assumed that a knowledge of SETTING the Flight Functions in FSX/FSUIPC and X-Plane are already known, so the instructions on Basic programming will not be covered here.
So with that in mind, Happy Flying
Desktop Aviator HOME Page
International Shipping Info
Programming the
Cessna Combo Panels
Cessna Combo Panels

Before programming the switches, plug the Panel into an unused USB Port and allow your computer to automatically install the needed Driver Software. All DTA circuit boards and panels are designed as HID Joystick inputs, so as to make the boards and panels compatible with all Windows Operating Systems.
With the Panel's Driver software installed, you can now RUN your FSX/FSUIPC (licensed version of FSUIPC is needed) or X-Plane (10.xx and up) and configure the switches as indicated below.
With the Panel's Driver software installed, you can now RUN your FSX/FSUIPC (licensed version of FSUIPC is needed) or X-Plane (10.xx and up) and configure the switches as indicated below.
Installation Instructions
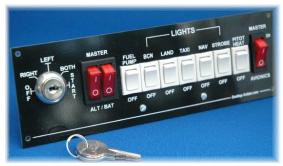
Panel Key/Toggle Switch
| Key Switch OFF | FSUIPC Button #15 | Magneto OFF |
| Key Switch RIGHT | FSUIPC Button #16 | Magneto RIGHT |
| Key Switch LEFT | FSUIPC Button #17 | Magneto LEFT |
| Key Switch BOTH | FSUIPC Button #18 | Magneto BOTH |
| Key Switch START | FSUIPC Button #19 | Magneto START |
| Master ALT | FSUIPC Button #0 | Toggle Master Alternator |
| Master BAT | FSUIPC Button #1 | Toggle Master Battery |
| Fuel Pump | FSUIPC Button #2 | Toggle Elec Fuel Pump |
| BCN | FSUIPC Button #3 | Toggle Beacon Lights |
| LAND | FSUIPC Button #4 | Landing Lights Toggle |
| TAXI | FSUIPC Button #5 | Toggle Taxi Lights |
| NAV | FSUIPC Button #6 | Toggle NAV Lights |
| STROBE | FSUIPC Button #7 | Strobes Toggle |
| PITOT HEAT ON (up) | FSUIPC Button #12 | Pitot Heat ON |
| PITOT HEAT OFF (dwn) | FSUIPC Button #13 | Pitot Heat OFF |
| MASTER AVIONICS | FSUIPC Button #9 | Toggle Avionics Master |
FSUIPC Button #
FSUIPC Assignment
| Key Switch OFF | magnetos | Magnetos OFF |
| Key Switch RIGHT | Magnetos right for engine #1 | |
| Key Switch LEFT | Magnetos left for engine #1 | |
| Key Switch BOTH | Magnetos both for engine #1 | |
| Key Switch START | starters | Engage starter #1 |
| MASTER ALT | electrical | Generators all Toggle |
| MASTER BAT | Batteries all Toggle | |
| FUEL PUMP | fuel | Fuel pumps Toggle |
| BCN | lights | Beacon lights Toggle |
| LANDING | Landing lights Toggle | |
| TAXI | Taxi lights toggle | |
| NAV | Nav lights toggle | |
| STROBE | Strobe lights toggle | |
| PITOT HEAT ON (up) | ice | Anti-ice LEFT pitot heat ON |
| PITOT HEAT OFF (dwn) | Anti-ice LEFT pitot heat OFF | |
| MASTER AVIONICS | systems | Avionics toggle |
Panel Key/Toggle Switch
But:adv Folders
X-Plane Assignment
Below are 2 Tables, one for FSX/FSUIPC and the second for X-Plane. First, run your version of FSX. With the Cessna Panel plugged into the USB Port on your computer and FSX running, go into the SETTINGs Window and program each switch on the panel to the following flight functions located in FSUIPC.
Now with the switches programmed for FSX, choose and load an available aircraft. Test all switches for the correct programming function. If all is OK, exit FSX/FSUIPC. Now it is time to program the switches for X-Plane.
With the introduction of X-Plane 10.xx, Laminar Research now allows X-Plane to use the setting TOGGLE on many flight functions. So with these functions now available to us, we can easily use the same Cessna Panel for both FSX and X-Plane.
So with the Cessna Panel still plugged into the same USB port used by FSX programming, run your copy of X-Plane. Bring the Mouse cursor to the very top of the screen and click on Joystick Settings and program the switches to the Flight Functions as seen in Table 2
With the Panel now programmed for X-Plane Flight Functions, load and run one of the many aircraft available. Test all switches and key switch positions for the correct operation.
With the programming complete, you can now load and run either FSX/FSUIPC or X-Plane without spending the aditional money for a second Cessna Panel.
By the way, all Cessna Combo Panels are also compatible with Prepar3d.
With the programming complete, you can now load and run either FSX/FSUIPC or X-Plane without spending the aditional money for a second Cessna Panel.
By the way, all Cessna Combo Panels are also compatible with Prepar3d.
Happy Flying!
Programming the Cessna Panel