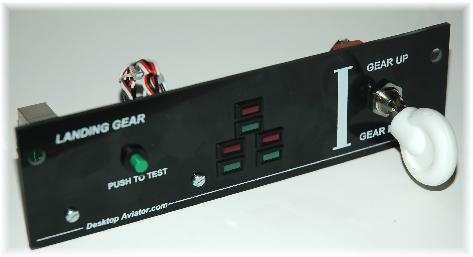
Thank you for your purchase of our Model 2696 Landing Gear Panel.
The 2696 simulates the random Landing Gear Sequence from Gear Down to Gear Up and Locked position by the lighting of 3 RED and 3 GREEN LED indicator lights.
Now Compatible with MS2020 Flight Simulators
Desktop Aviator HOME Page
International Shipping Info
Programming the
2696 Landing Gear Panel

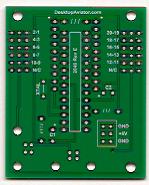
The Landing Gear board is a joystick/gamepad device that has 3 dedicated input pins for landing gear functions and another 11 input pins free for other Digital (toggle Switch) purposes. The board has 6 output pins where LEDs can be connected as 'landing gear position indicators'. In general these are 3 red lights for a moving gear indication and 3 green lights for the gear down and locked situation.
The Model 2695 Landing Gear Panel was designed to be flush mounted inside your homemade aircraft panel or the GoFlight Panel Rack. The Landing Gear measures 7.25in inches by 2.0 inches.
Two mounting holes are provided to help in the fastening the Landing Gear Panel to your flightdeck or Rack. Once mounted inside your flightdeck or GoFlight Rack, take the USB cable coming from the Landing Gear and insert it into an unused USB port on your computer. The computer will automatically sense and load the appropriate driver software.
Once loaded, this software will remain on the computer even in the event of a power-down.
Something new has been Added: Look at the GREEN circuit board (see Below) on the back of the panel. You will now see a 3-pin male connector and a 2-wire cable. This allows you to select wheather you want a Pulsed USB Output (Pin #1 to Center) or Constant ON USB Output (Pin #2 to Ground). From here on, we wil call this 3-pin Male Connector, the
"OUTPUT SELECTOR"
Installing the Landing Gear
With the Landing Gear Panel plugged into your computer and the driver software is loaded, it's now time to program the Lever Switch to operate the Landing Gear Extension and Retraction events. Now would be a good time to let you know that you MUST Keep the Landing Gear Panel Panel connected to the SAME USB port as it is now. If removed and placed into another USB port, all your programming will be lost. So before starting the programming, make sure you are comfortable with the Landing Gear's USB port. If so, lets start programming the Panel.
Programming the Landing Gear Panel with FSX
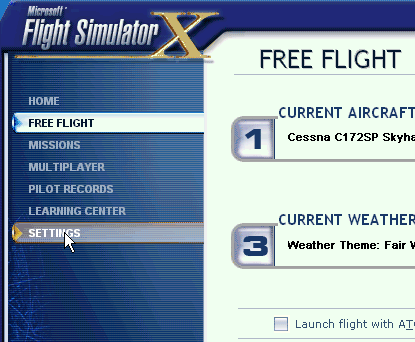
When you first run FSX, you will be shown the window seen to the left.
To start Programming the Landing Gear Panel, you need to "CLICK" on the SETTINGS icon as shown.
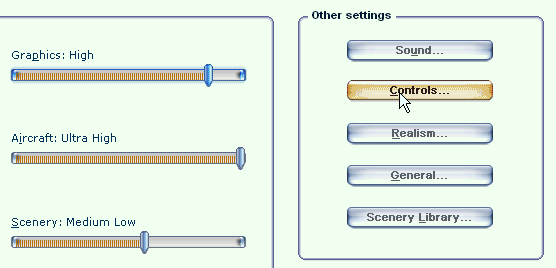
You will then encounter the screen to the right.
Locate the "Controls..." icon then "Click"
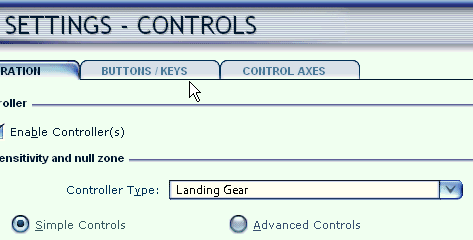
The next window is where you choose the "Controller Type: Locate
Landing Gear then "Click"
To continue programming the Panel, "Click" on
BUTTONS/KEYS
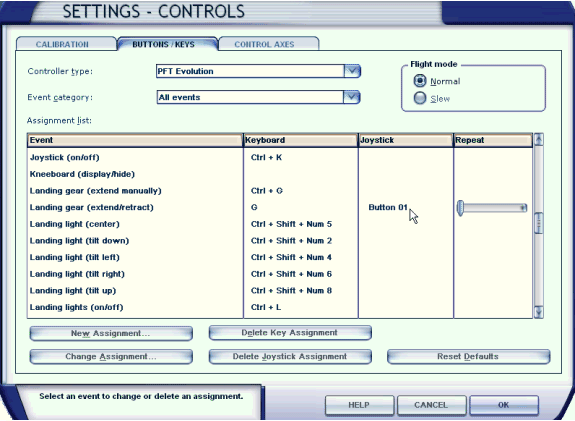
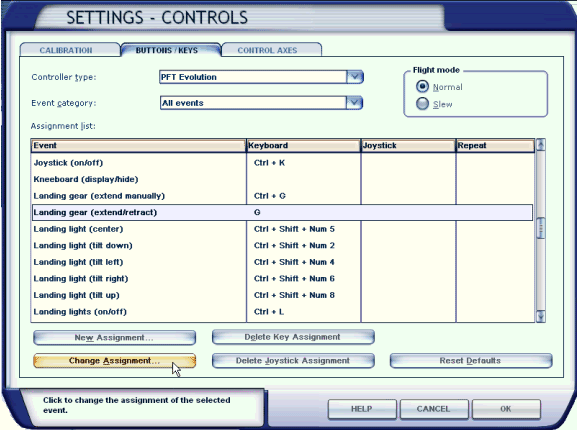
Then by going back to the Main SETTINGS - CONTROL window, you can see that the Landing Gear (extend/retract) has been programmed. Also note that the REPEAT Bar is Fully to the LEFT.
Programming the Landing Gear Panel with FS2002 and FS2004 is the same as described for FSX, just the layout of each window might be a little different, but the programming is the same.
This completes the programming of the Landing Gear. To use the LG; before starting your Flight Simulator, place the LG Lever in the DOWN position. This is the default position. The Panel does incorporate a "Push to Test" feature. Pressing this button illuminates all 6 LED indicator lights.
Just as before, this is the window where all the settings are made. Find Event catagory: And locate Landing Gear (extend/retract). With your Mouse, click on Change Assignments
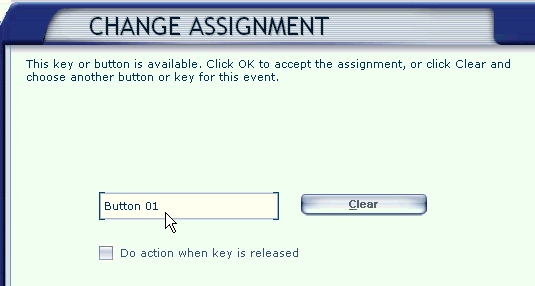
By clicking on Landing Gear (extend/retract), you are brought to the Change Assignments window as seen above. Flip the Landing Gear Lever either UP or DOWN. Button 1 will appear inside the white box. Then press OK
Programming the Landing Gear with MS2020
In the home screen go to 'OPTIONS' --> 'CONTROLS' page. In the top row all your input devices are listed. Besides 'KEYBOARD', 'MOUSE' and your 'JOYSTICK' there should be an entry 'LANDING GEAR' when it is plugged into your PC. As it has no assignments yet the 'DEFAULT' profile is associated with it which is empty.In the left column, under the category 'FILTER' select 'ALL'. The middle column now shows a list of all available commands. Scroll down until you see the 'LANDING GEAR' section. Here you find 6 entries.
Start with the first entry 'TOGGLE LANDING GEAR'. To the right you see two input fields, select the left one. A new dialog opens and you should click on 'Select an input'. Now you can select a joystick button, in our case it is button (1). Leave this dialog with a click on 'VALIDATE'. Next entry is 'GEAR DOWN'. Select it and in the following dialog select button (2) and leave with 'VALIDATE'.
Finally, pick the 'GEAR UP' entry and select button (3) as described above.
If you wish to assign more buttons/inputs proceed as shown above. If no more assignments are wanted click on the button on the bottom left or hit the <ESC> key. Another dialog opens and should be quit with 'APPLY AND SAVE' when you are satisfied with your work. That's all.
Programming the L Gear Panel with X-Plane
Start X-Plane. After the splash screen has finished 5 buttons on the left side of the window give you a first choice. Click on the 'Settings'button and on the next screen select the 'Joystick' menu. This menue has three main sections. On the left hand
side you have the choice between the attached joysticks. Provided you have plugged in the 'Landing Gear' board you can select it now.
On the right hand side there appears the 'BUTTONS' section with the 15 buttons of the board. Click on 'Edit' aside 'Btn 0'. A menu list with all available commands is shown and we are looking for the landing gear functions. Either scroll down the list
or - more comfortably - fill in the search field with'landing gear'. Then we have the choice of 5 commands and we select 'Landing gear toggle' for our button. Click 'Apply' and 'Edit' 'Btn 1' next. Out of the 5 choices we select 'Landing gear up'
and click 'apply' again. Finally, 'Btn 2' is connected with 'Landing gear down' command as described before. If you wish to associate more buttons proceed in the same way. At the end we hit 'Done' and the Simulator is configured for the landing gear board.
Programming the L anding Gear Panel with P3D
P3D differs a bit from X-Plane and MS2020 as there is no 'gear up' nor 'gear down' command but only 'Landing gear (extent/retract)' which in fact is a toggle command. Plug in the Landing Gear board and start P3D. When it loaded successfully the screen shows a start menu with some buttons at the bottom. Select 'Options' then 'Key Assignments'. In the top row there is a choice of 'Controller:' Select 'Landing Gear' here. Scroll down the alpabetically sorted list of commands until you see the entries dealing with 'Landing gear (extent/retract)'.
By default there are two entries with 'Button 8' and 'Button 10' assignments and one for the 'G' key. Double click on the entry with the 'G'assignment. A dialog opens and you are requested to push a joystick button. Press the one you attached to input #1 and watch the text 'Button 1' appearing in the text field. Confirm it with a click on 'OK'. Notice that a new entry 'Landing gear
(extent/retract)' is generated for button #1 and the 'G' assignment remains untouched. Next we override 'Button 8' and 'Button 10' with 'Button 2' and 'Button 3': Double click on one of these items. The dialog pops up. Now CLOSE the switch attached to input #2 of the board and watch the text 'Button 2' appearing. Confirm with a click on 'OK'. Proceed with the next item in the same way but now OPEN the switch on input #2. The text 'Button 3' should appear. Click 'OK'. A problem with the toggling behaviour is that switches can get unsynchronized with the lever position (and landing gear state) in the Sim.
Since the indicator LEDs of the board are synchronized with input #1 and input #2 it might be useful to assign another input (i.e. a pushbutton on input #5) to the landing gear command. This button has no effect on the indicators but toggles
the lever in the Sim.
Overview of the Landing Gear Panel
To TEST all Six LEDs
just press the Green
Button
OUTPUT SELECTOR:
Pin #1 to Center for
Pulsed Output
Landing Gear toggle
If using FSUIPC a
Pulsed output
will also work.
OUTPUT SELECTOR:
Pin #2 to Center for
Pulsed Output
Set for:
Landing Gear Retract
Landing Gear Extend
OUTPUT SELECTOR:
Pin #3 to Center for
Constant Output
For some reason MS2020 does not like a pulsed output for the Landing Gear.
So we use the
Constant ON:
Landing Gear Retract
Landing Gear Extend
OUTPUT SELECTOR:
Pin #1 to Center for
Pulsed Output
A Constant ON output
will also work
OUTPUT SELECTOR:
Pin #3 to Center for
Constant Output
Set for:
Landing Gear Retract
Landing Gear Extend
OUTPUT SELECTOR:
Pin #1 to Center for
Pulsed Output
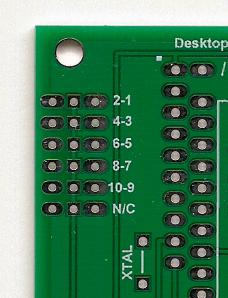
To make the 2696 panel truly universal device, we incorporated 3 user selectable inputs; Pin #1 to Center pin; Pin #2 to Center
pin and Pin #3 to Center pin. These numbers are silkscreen onto the top layer of the circuit board on the left side.
Output Selector Options
Center Pin
Ground (x6)
Taking the 2-wire cable running to the Locking Toggle Switch and inserting it into:
Pin #1 to Center pin, you will get a .25 second pulse at RED Button #1 on the Calibration window (see below) when flipped UP and another Pulsed output on RED Button #1 when flipped Down.
Pin #2 to Center pin, you will get a .25 second pulse when the Toggle switch is flipped. RED Button #2 Pulses ON when lever is flipped UP
and RED Button #3 Pulses ON then flipped Down.
Pin #3 to Center pin, you will get a Constant ON when the toggle is flipped. RED Button #4 Constant ON when toggle switch is flipped UP. It changes to a RED Button #5 Constant ON when flipped Down.
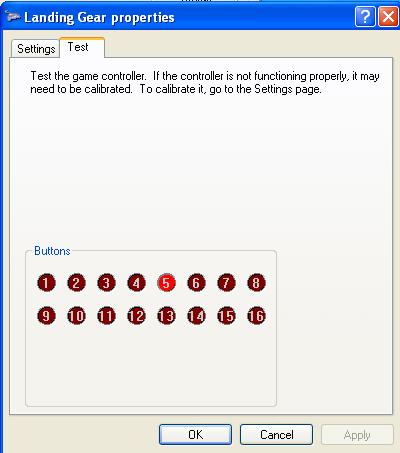
Calibration window
RED Buttons. These Buttons will light with the appropriate pins shorted to Center Traminal (Ground)
RED Button being ON is normal
Please NOTE: Prior to powering-up your flight sim, place the Landing Gear Lever in the Default position. It is usually in the Landing Gear Extend position.